This is a 100% decentralized blockchain red packet application. Users can connect their wallets, set an amount and quantity to send red packets, and then share a link for others to claim. All data and operations are based on the blockchain, completely eliminating the need for centralized servers, making the entire process secure, transparent, and traceable.
If you’re interested, you can check out my code on GitHub: redpacket‑dapp
Feature Highlights
- 🧧 Send Red Packet: Connect your wallet, set the amount and quantity, and send a red packet to the blockchain.
- 🎁 Claim Red Packet: Through a shared link, others can connect their wallets and claim the red packet directly from the blockchain.
- 🔗 Smart Contract: Secure smart contracts written in Solidity handle all logic.
- 🌐 Multi-chain Support: Supports local testnet and BSC testnet.
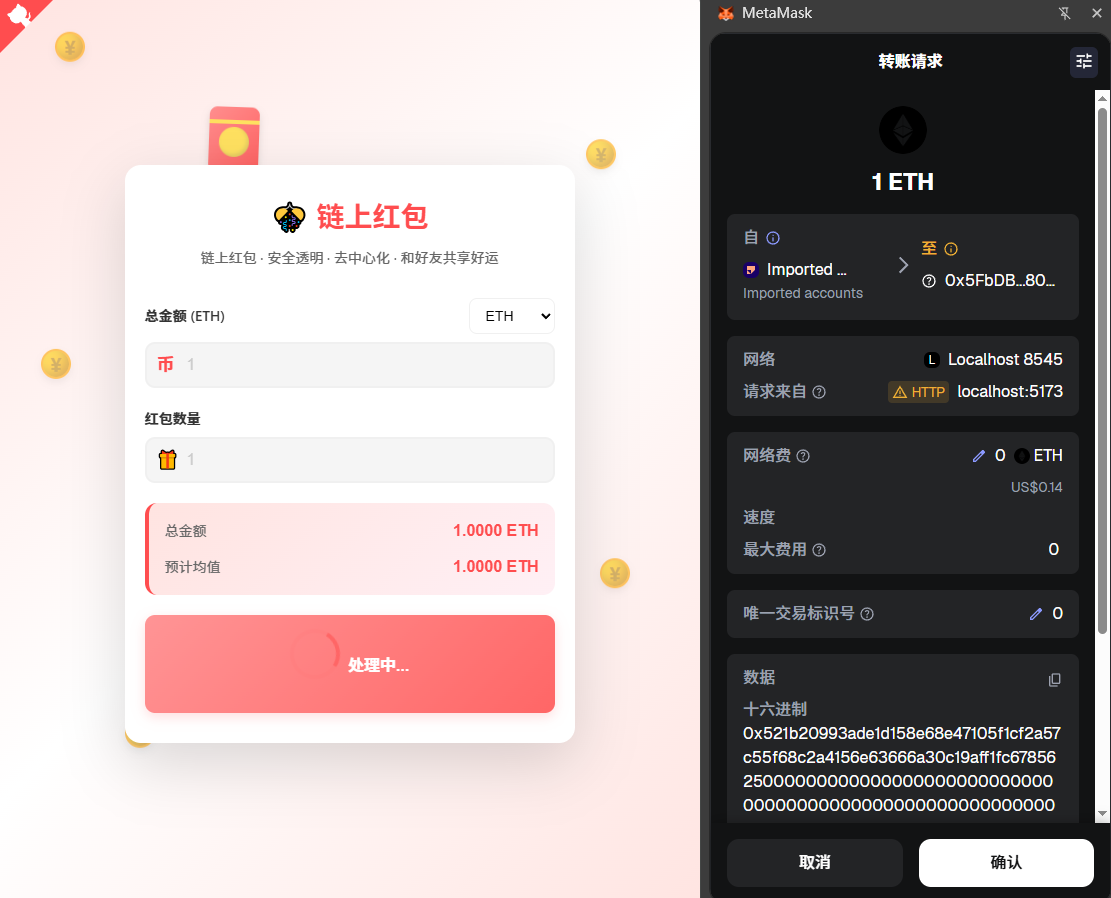
- 💼 Web3 Integration: Uses MetaMask wallet connection.
- 🚀 Fully Decentralized: No backend server, all data stored on the blockchain.
Tech Stack
- Frontend: React 19, React Router 6, TypeScript, Vite, Ethers v6
- Contract Layer: Hardhat, Solidity 0.8.x
- Tools: ESLint, Prettier
- No Backend Required: Zero server dependencies ❌
Quick Start
# 1. Install project dependencies
npm install
cd react-dapp && npm install && cd ..

# 2. Start local blockchain node
npm run node

# 3. Compile smart contracts
npx hardhat compile

# 4. Deploy smart contracts
npm run deploy

# 5. Start frontend
npm run frontend
Directory Structure
redpacket-web3/
├─ contracts/                # Solidity smart contracts
│  └─ RedPacket.sol
├─ react-dapp/               # React + Vite frontend
│  ├─ src/
│  │  ├─ components/         # Common components (wallet button, create form, etc.)
│  │  ├─ config/             # ABI, contract address configuration
│  │  ├─ hooks/              # Custom hooks (useWallet)
│  │  ├─ pages/              # Pages (Home, ClaimPacket)
│  │  ├─ styles/             # Global styles
│  │  ├─ utils/              # Web3 utility functions
│  │  └─ App.tsx             # Routing and layout
│  ├─ .env.example           # Frontend environment variable instructions
│  └─ package.json
├─ scripts/
│  └─ deploy.js              # Hardhat deployment script (automatically writes to frontend config)
├─ hardhat.config.js
└─ package.json              # Root scripts (Hardhat + frontend one-click start)
Usage Guide
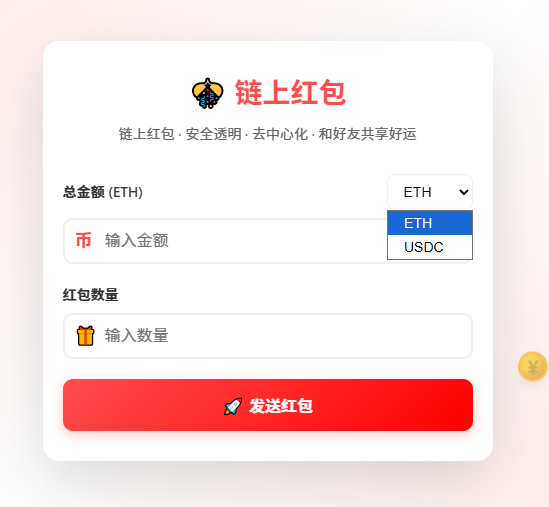
Create a Red Packet
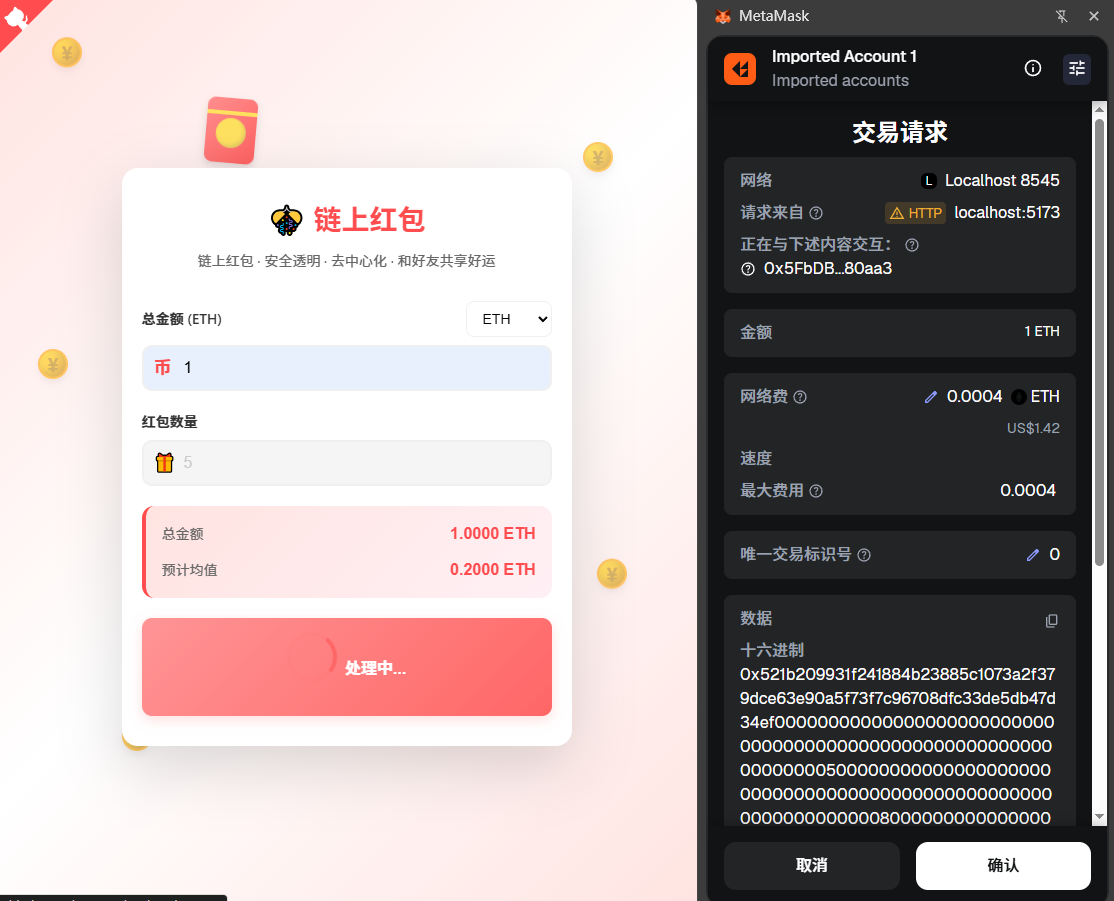
- Open the frontend and click “Connect Wallet” in the top right corner.
- Fill in the total red packet amount and number of shares; the application will randomly split the amount on the frontend.
- Submit and confirm the transaction in MetaMask, then wait for block confirmation.
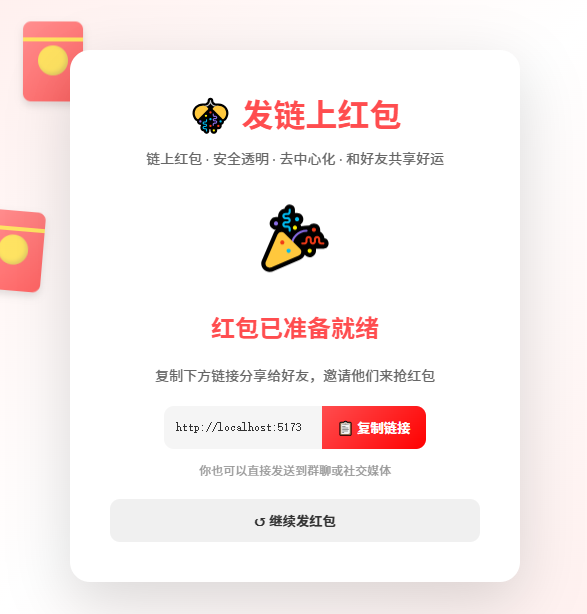
- Upon success, copy the system-generated claim link and share it with friends.
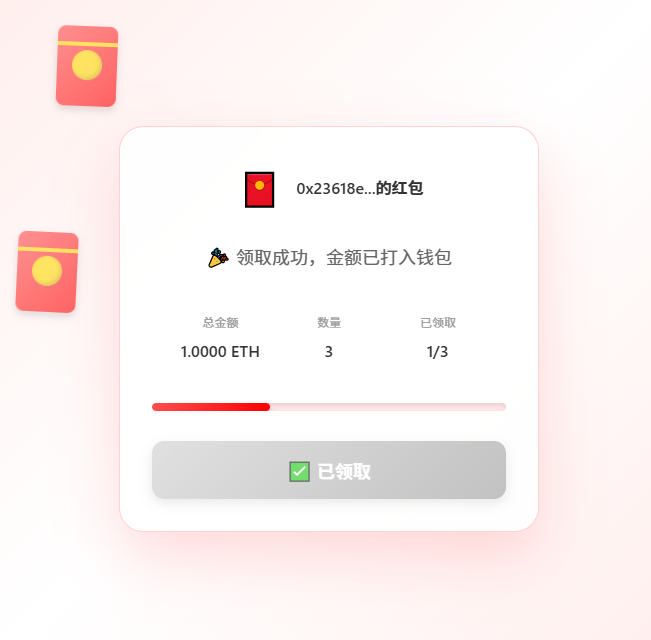
Claim a Red Packet
- Open the shared link (URL contains
/claim/{packetId}). - Connect your wallet first, then click “Claim”.
- After signing and confirming, wait for the block to be mined. The page will display the result and remaining shares.
Environment Variables
dapp/.env(automatically ignored in development, please refer to.env.example)VITE_RPC_URL: Frontend direct RPC node, defaults tohttp://127.0.0.1:8545VITE_CONTRACT_ADDRESS: Can override the address written by the deployment scriptVITE_CHAIN_ID: Chain ID (hexadecimal) prompted for use by the frontend
root/.env: If you need to reference private keys or BSC RPC in Hardhat, you can continue to use the original syntax.
Smart Contract (RedPacket.sol)
Core methods:
createRedPacket(bytes32 packetId, uint256 totalCount, uint256[] amounts): Creates a red packet and deposits ETH/BNB into the contract.claimRedPacket(bytes32 packetId, uint256 index): Claims a red packet and distributes the amount according to a random index.getPacketInfo(bytes32 packetId): Queries red packet total amount, quantity, claim status, etc.hasClaimed(bytes32 packetId, address user): Checks if a user has already claimed.
Hardhat node or BSC testnet can reuse the above interfaces. The deployment script will synchronize the latest address to the frontend. If redeploying, please rerun npm run deploy.
Deploy USDC (USDC.sol)
-
Compile all contracts
npx hardhat compile -
Deploy ERC-20 USDC token
npx hardhat run scripts/deploy-usdc.js --network localhost -
Commands
- Enter Hardhat environment
npx hardhat console --network localhost-
Send test tokens
const usdc = await ethers.getContractAt("USDC","0xe7f1725E7734CE288F8367e1Bb143E90bb3F0512"); await usdc.transfer("0x8626f6940E2eb28930eFb4CeF49B2d1F2C9C1199",ethers.utils.parseUnits("1000", 6)); -
Query balance
const balance = await usdc.balanceOf("0x23618e81E3f5cdF7f54C3d65f7FBc0aBf5B21E8f");
console.log(ethers.utils.formatUnits(balance, 6));
Networks
Local Hardhat
- Network Name: Hardhat Localhost
- RPC URL: http://127.0.0.1:8545
- Chain ID: 1337 (0x7a69)
- Currency Symbol: ETH
- Block Explorer: None (view in local node console)
BSC Testnet
- Network Name: BSC Testnet
- RPC URL: https://data-seed-prebsc-1-s1.binance.org:8545
- Chain ID: 97
- Currency Symbol: tBNB
- Block Explorer: https://testnet.bscscan.com
FAQ
- How to use BSC Testnet?
Add the BSC network in Hardhat configuration and deploy, or pointVITE_RPC_URLto the BSC node, and changeVITE_CONTRACT_ADDRESSto the corresponding on-chain address.
Happy red packet grabbing! 🧨
⚠️ Reminder: This project is for functionality and feasibility testing only, has not been deployed to testnet or mainnet, and has not undergone complete security testing. Please do not use it for actual asset operations. Risks arising from its use are to be borne by yourself.